Today marks The Full Measure’s first “Fashion Friday” feature! Since reading about French designer Olympia Le-Tan’s book clutches in the May issue of InStyle magazine, I’ve been intrigued by the concept of transforming a book into a fashion accessory. I love to hunker down with a good book, therefore the idea of wearing my devotion sounded fascinating.
Audrey Hepburn certainly did her part to make clutching a book look chic in the 1957 film Funny Face…and now it seems other trendsetting Hollywood stars have rekindled the notion. According to InStyle, Natalie Portman and Tilda Swinton have both been seen carrying book clutches to special events. Olympia Le-Tan’s book clutches are painstakingly embroidered by hand to look like first edition covers of well-loved books. The interiors are swathed in beautiful Liberty prints and only a limited edition of each title are made. Dreaming of owning my very own Olympia Le-Tan creation, I began to wonder if I could transform a book into a clutch without the couture price tag. And while it certainly wouldn’t have the extraordinary details of Le-Tan’s, it could still pay homage to the idea that smart can be synonymous with sexy when a book is clutched with style.
The first step was to select a book. Several years ago I had purchased a stack of vintage books to decorate a pair of curio cabinets. I’m sad to say the books were merely chosen for their looks rather than their content (I’m a believer in the “don’t judge a book by its cover” philosophy when it comes to friends and food). There happened to be one book in the stack on gardening aptly titled Gardening: A Complete Guide to Garden Making, written by horticulturalist Montague Free and published in 1937. It had a lovely worn appearance and neutral color, with a sweet illustration on the cover. The first few pages were beautiful, too. While it pained me to sacrifice the important content of the book, I did so in the name of fashion.
Second, I gathered supplies for the experiment. Armed with a detailed tutorial for “How to Make a Secret Hollow Book” from the blog How to Do Stuff (who’s disclaimer states “some things described on this site are potentially dangerous/illegal” making me slightly nervous, but not deterred), I assembled Elmer’s paper craft glue, a ruler, mechanical pencil, paintbrush, small bowl and x-acto knife.
Since I wanted to save the first few pages of the book, I opened to the table of contents and began the process. I then mixed a little bit of water with the glue in a small bowl (to thin the glue a tad) and brushed it liberally on the sides. With the first few pages still separated from the rest of the book, I placed a thin piece of cardboard between the two sections (to serve as a spacer). Next, I placed a couple of heavy boxes of plates (that come out on seasonal rotation) on top of the book and waited 30 minutes for the glue to dry. I also placed a piece of tissue paper under the book to catch any errant drips.
After the glue dried, I used a pencil and ruler to mark half-inch margins around the four sides of my chosen top page.
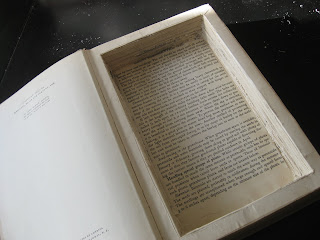
Using the ruler once more, I then cut along the inside of the four lines with an x-acto knife. I was able to cut out a few pages at a time and assembled them in a pile to use for later projects.
Once I carved to my desired depth (about ¾ through the book), I used a hairdryer on a cool setting to blow away any little paper particles clinging to the cut edges and then brushed glue on the interior edges. I also erased visible pencil marks and used the last remaining glue to put a second coat on the exterior sides. Placing the cardboard spacer between the carved section and the pages I wanted to save once more, I stacked the plates atop the book and let the glue dry overnight.
In the morning, I removed the stacks of plates and the cardboard spacer. All interior and exterior edges were completely dry, solid and ready for the final step: lining the interior with fabric. I selected a coordinating Alexander Henry bird print and then sized a ¼-yard piece to the interior. I marked the size with a chalk pencil and sewed corners, also turning raw edges in. Figuring all purpose tacky glue might work better at bonding the fabric to the paper, I applied it instead of the paper craft glue to the interior of the book and then pressed the fabric into place.
And within a matter of minutes…voila! A book clutch of my very own. I’m so glad I retained the first few pages. They were just too pretty to discard and look wonderful with the fabric. The size is perfect for a few essentials and when closed, looks as if I’m simply a hopeless romantic dreaming of the perfect English garden.
In preparation for the next opportunity to don my newest accessory, I rushed to my closet to whip up an ensemble. On a lovely day – perhaps while perusing the farmer’s market downtown – I’ll pair it with a striped Kate Spade dress, vintage Rebecca Taylor espadrilles, Tom Ford cat eye sunglasses and my favorite summer cloche, handmade by Pinkham Millinery in Portland.
I hope to exude a studiously-chic vibe…with a little extra change jangling in my pockets.


Yay for fashion friday, and the Tom Ford's are to die for!
ReplyDeleteOr jangling in your book? :) Very creative, Katie. I enjoy your projects. You make them seem effortless, but I know you take lots of time and pay close attention to detail to make them high-quality.
ReplyDeleteThis is my first attempt, but i love yours, very cute :)
ReplyDeleteplease tell me what you think :)
http://fridaylovesbooks.blogspot.com/2012/02/first-diy-hollowed-book-clutch.html
I did!
ReplyDeletehttp://www.portaldeartesanato.com.br/vendo/produtos/detalhe/21785/bolsa+livro
=D